
Prerequisites
This article requires a few things in order to get started:
- You have an ARM template params file here, we’ll call ours:
deploy-parameters.json - You have the core Azure template here, we’ll call ours:
arm-template.json - You have an api that is protected by Azure Active Directory Authentication (Easy Auth)
- You have a storage account created
- (Optional) App Insights Instance
- (Optional) You have a CI/CD pipeline setup on Azure DevOps.
- Everything done in the pipeline can also be done via Azure CLI
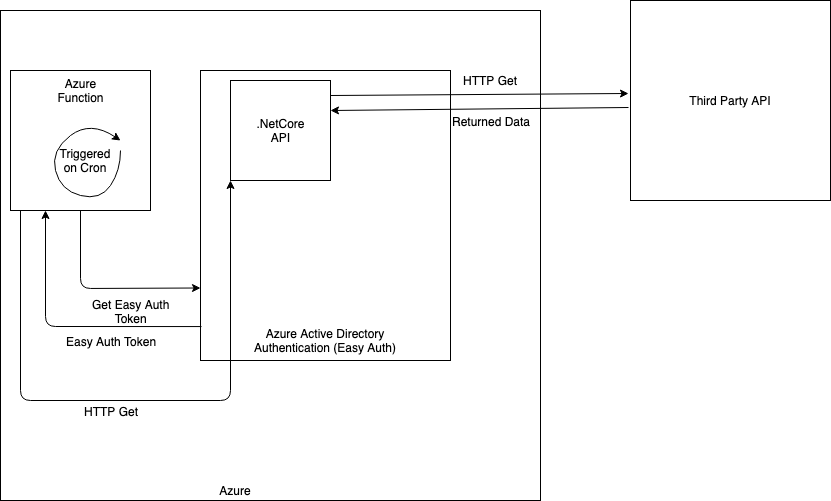
The use case we were trying to solve for our partner was to be able to invoke our .Net Core api that was protected by Azure Active Directory Authentication (Easy Auth). We also wanted to deploy this function via an ARM template to allow flexibility and feature parity in environments. The goal of our function was to run on a cron to invoke an api on our api that would trigger a fetch from the api to a third party API to get and save data. The assumption for this article is that you already have a project hosted on Azure that has Azure Active Directory Authentication (Easy Auth) enabled.
The goal of this post it to take you from wanting to use an Azure Function to invoking your protected api via an Azure Function.
Azure ARM Template
We will first begin by adding our required Azure Function values to our deploy-parameters.json as shown
{
    “parameters”: {
"azureFunctionAppSettings": {
           		 "value": {
                  	          "api_url": "REPLACE_ME",
             	          "client_secret": "REPLACE_ME",
                	          "client_id": "REPLACE_ME",
                                  "resource": "REPLACE_ME",
                                  "token_url": "REPLACE_ME"
            	}
        }, …
    }, …
}
this will also allow our pipeline to substitute the values on deploy for each environment on deploy. * Note if you are only deploying to one environment feel free to hardcode the values at this step.
After that we need to add this to parameters to the arm-template.json in the parameters section.
{
    “parameters” : {
        "azureFunctionAppSettings": {
            "type": "object"
        }, ...
    } …
}
Further down in arm-template.json we need to add the code to create the Azure Function resource like
{
  "resources": [
        {
          {
            "comments": "This is the function app section",
            "apiVersion": "2016-08-01",
            "type": "Microsoft.Web/sites",
            "name": "<YOUR FUNCTION NAME HERE>",
            "location": "<The Location of You App Resources>",
            "kind": "functionapp",
            "dependsOn": [
                "[resourceId('Microsoft.Storage/storageAccounts', <Your Storage account name>)]",
                "[resourceId('Microsoft.Web/serverfarms', <Your App Service Plan Name>)]",
                "[resourceId('Microsoft.Insights/components', <Your App Insights name>)]"
            ],
            "properties": {
                "serverFarmId": "[resourceId('Microsoft.Web/serverfarms', <Your App Service Plan Name>)]",
                "clientAffinityEnabled": false,
                "siteConfig": {
                    "alwaysOn": true,
                    "appSettings": [
                        {
                            "name": "api_url",
                            "value": "[parameters('azureFunctionAppSettings').api_url]"
                        },
                        {
                            "name": "token_url",
                            "value": "[parameters('azureFunctionAppSettings').token_url]"
                        },
                        {
                            "name": "client_secret",
                            "value": "[parameters('azureFunctionAppSettings').client_secret]"
                        },
                        {
                            "name": "client_id",
                            "value": "[parameters('azureFunctionAppSettings').client_id]"
                        },
                        {
                            "name": "resource",
                            "value": "[parameters('azureFunctionAppSettings').resource]"
                        },
                        {
                            "name": "FUNCTIONS_WORKER_RUNTIME",
                            "value": "dotnet"
                        },
                        {
                            "name": "AzureWebJobsStorage",
                            "value": "[concat('DefaultEndpointsProtocol=https;AccountName=', <Your Storage account name>, ';AccountKey=', listKeys(resourceId('Microsoft.Storage/storageAccounts', <Your Storage account name>),'2015-05-01-preview').key1)]"
                        },
                        {
                            "name": "FUNCTIONS_EXTENSION_VERSION",
                            "value": "~2"
                        },
                        {
                            "name": "APPINSIGHTS_INSTRUMENTATIONKEY",
                            "value": "[reference(resourceId('Microsoft.Insights/components/', <Your App Insights name>)).InstrumentationKey]"
                        }
                    ]
                }
            }
        }, ...
     }
  }
}
This is the resource we will use to deploy our Azure Function on an app service plan. We do have our function set to always on, due to an app service plan not having a cold start. We also have this on due to an error of deploying new code to Azure will turn the host off when new code is deployed without it. The second section I want to specifically point out is the appSettings section. This is where environment variables for your Azure Function will be stored. If you would like more information on the parameters we are using see here.
Once that is done your Azure Function Resource will be ready for our code.
Azure Function Code
The next step in the process will be creating our Microsoft Function project. Feel free to follow this link to get the project created and the Azure Function CLI to be able to test our functions locally. *Note be sure to create a time trigger function to follow our architecture image above.
Once your Azure function is generated make sure your project structure should be as the following
FunctionApp | - host.json | - Myfirstfunction | | - function.json | | - Myfirstfunction.cs | - mysecondfunction | | - …
Be sure your files contain the following
In host.json
{
    "version": "2.0",
    "functionTimeout": "00:5:00"
}
In function.json
{
    "bindings": [
        {
            "name": "Myfirstfunction",
            "type": "timerTrigger",
            "direction": "in",
            "schedule": "0 */10 * * * *"
        }
    ],
    "disabled": false
}
To find more information on these look here.
Finally the Myfirstfunction.cs
using System;
using System.Collections.Generic;
using System.Net.Http;
using System.Net.Http.Headers;
using System.Threading.Tasks;
using Microsoft.Azure.WebJobs;
using Microsoft.Extensions.Logging;

namespace FunctionApp
{
    public static class Myfirstfunction
    {
        [FunctionName("Myfirstfunction")]
        public static async Task RunFetchCbotPrices([TimerTrigger("0 */10 * * * *")] TimerInfo myTimer, ILogger log)
        {
            log.LogTrace("Myfirstfunction started");

            var finalResponse = await GetResponseMessage("api_url");

            log.LogTrace($"{finalResponse.Content.ReadAsStringAsync().Result}");
            log.LogTrace("Myfirstfunction Ran Well");
        }

        private static async Task<HttpResponseMessage> GetResponseMessage(string environmentVariableForUrl)
        {
            var httpClient = GetHttpClient();
            var fetchUrl =
                Environment.GetEnvironmentVariable(environmentVariableForUrl, EnvironmentVariableTarget.Process);

            return await httpClient.GetAsync(fetchUrl);
        }

        private static HttpClient GetHttpClient()
        {
            var httpClient = new HttpClient();
            var tokenUrl = Environment.GetEnvironmentVariable("token_url", EnvironmentVariableTarget.Process);
            var login = GetLoginInfo();

            var response = httpClient.PostAsync(tokenUrl, new FormUrlEncodedContent(login)).Result;
            var resolvedResponse = response.Content.ReadAsStringAsync().Result;
            var rawData = resolvedResponse.Split("access_token\":\"");
            var token = rawData[1].Split('"');

            httpClient.DefaultRequestHeaders.Authorization =
                new AuthenticationHeaderValue("Bearer", $"{token[0]}");
            return httpClient;
        }

        private static Dictionary<string, string> GetLoginInfo()
        {
            var clientSecret = Environment.GetEnvironmentVariable("client_secret", EnvironmentVariableTarget.Process);
            var clientId = Environment.GetEnvironmentVariable("client_id", EnvironmentVariableTarget.Process);
            var resource = Environment.GetEnvironmentVariable("resource", EnvironmentVariableTarget.Process);

            var loginInfo = new Dictionary<string, string>
            {
                {"client_secret", clientSecret},
                {"grant_type", "client_credentials"},
                {"client_id", clientId},
                {"scope", "user.read%20openid%20profile%20offline_access"},
                {"resource", resource}
            };
            return loginInfo;
        }
    }
}
This file will trigger the [Myfirstfunction] section on the cron that is matching in our function.json. It will call GetResponseMessage which in turns calls GetHttpClient(). GetHttpClient which will do the call from our Azure Function to the Azure Active Directory Authentication (Easy Auth) v1 token URL to get a token. Then, it saves it as an auth header for our HTTP client. After that we will read the Env url passed to GetResponseMessage and do the get to our actual .NetCore API. *Note for testing locally be sure to swap out all = Environment.GetEnvironmentVariable( with their actual values. After that our resource and function code should be ready for Azure DevOps. Before we deploy everything though we need to do some minor setup.
Azure DevOps
Build Pipeline
Now we can use the build pipeline to make sure our code is built and an artifact is ready for our release pipeline!
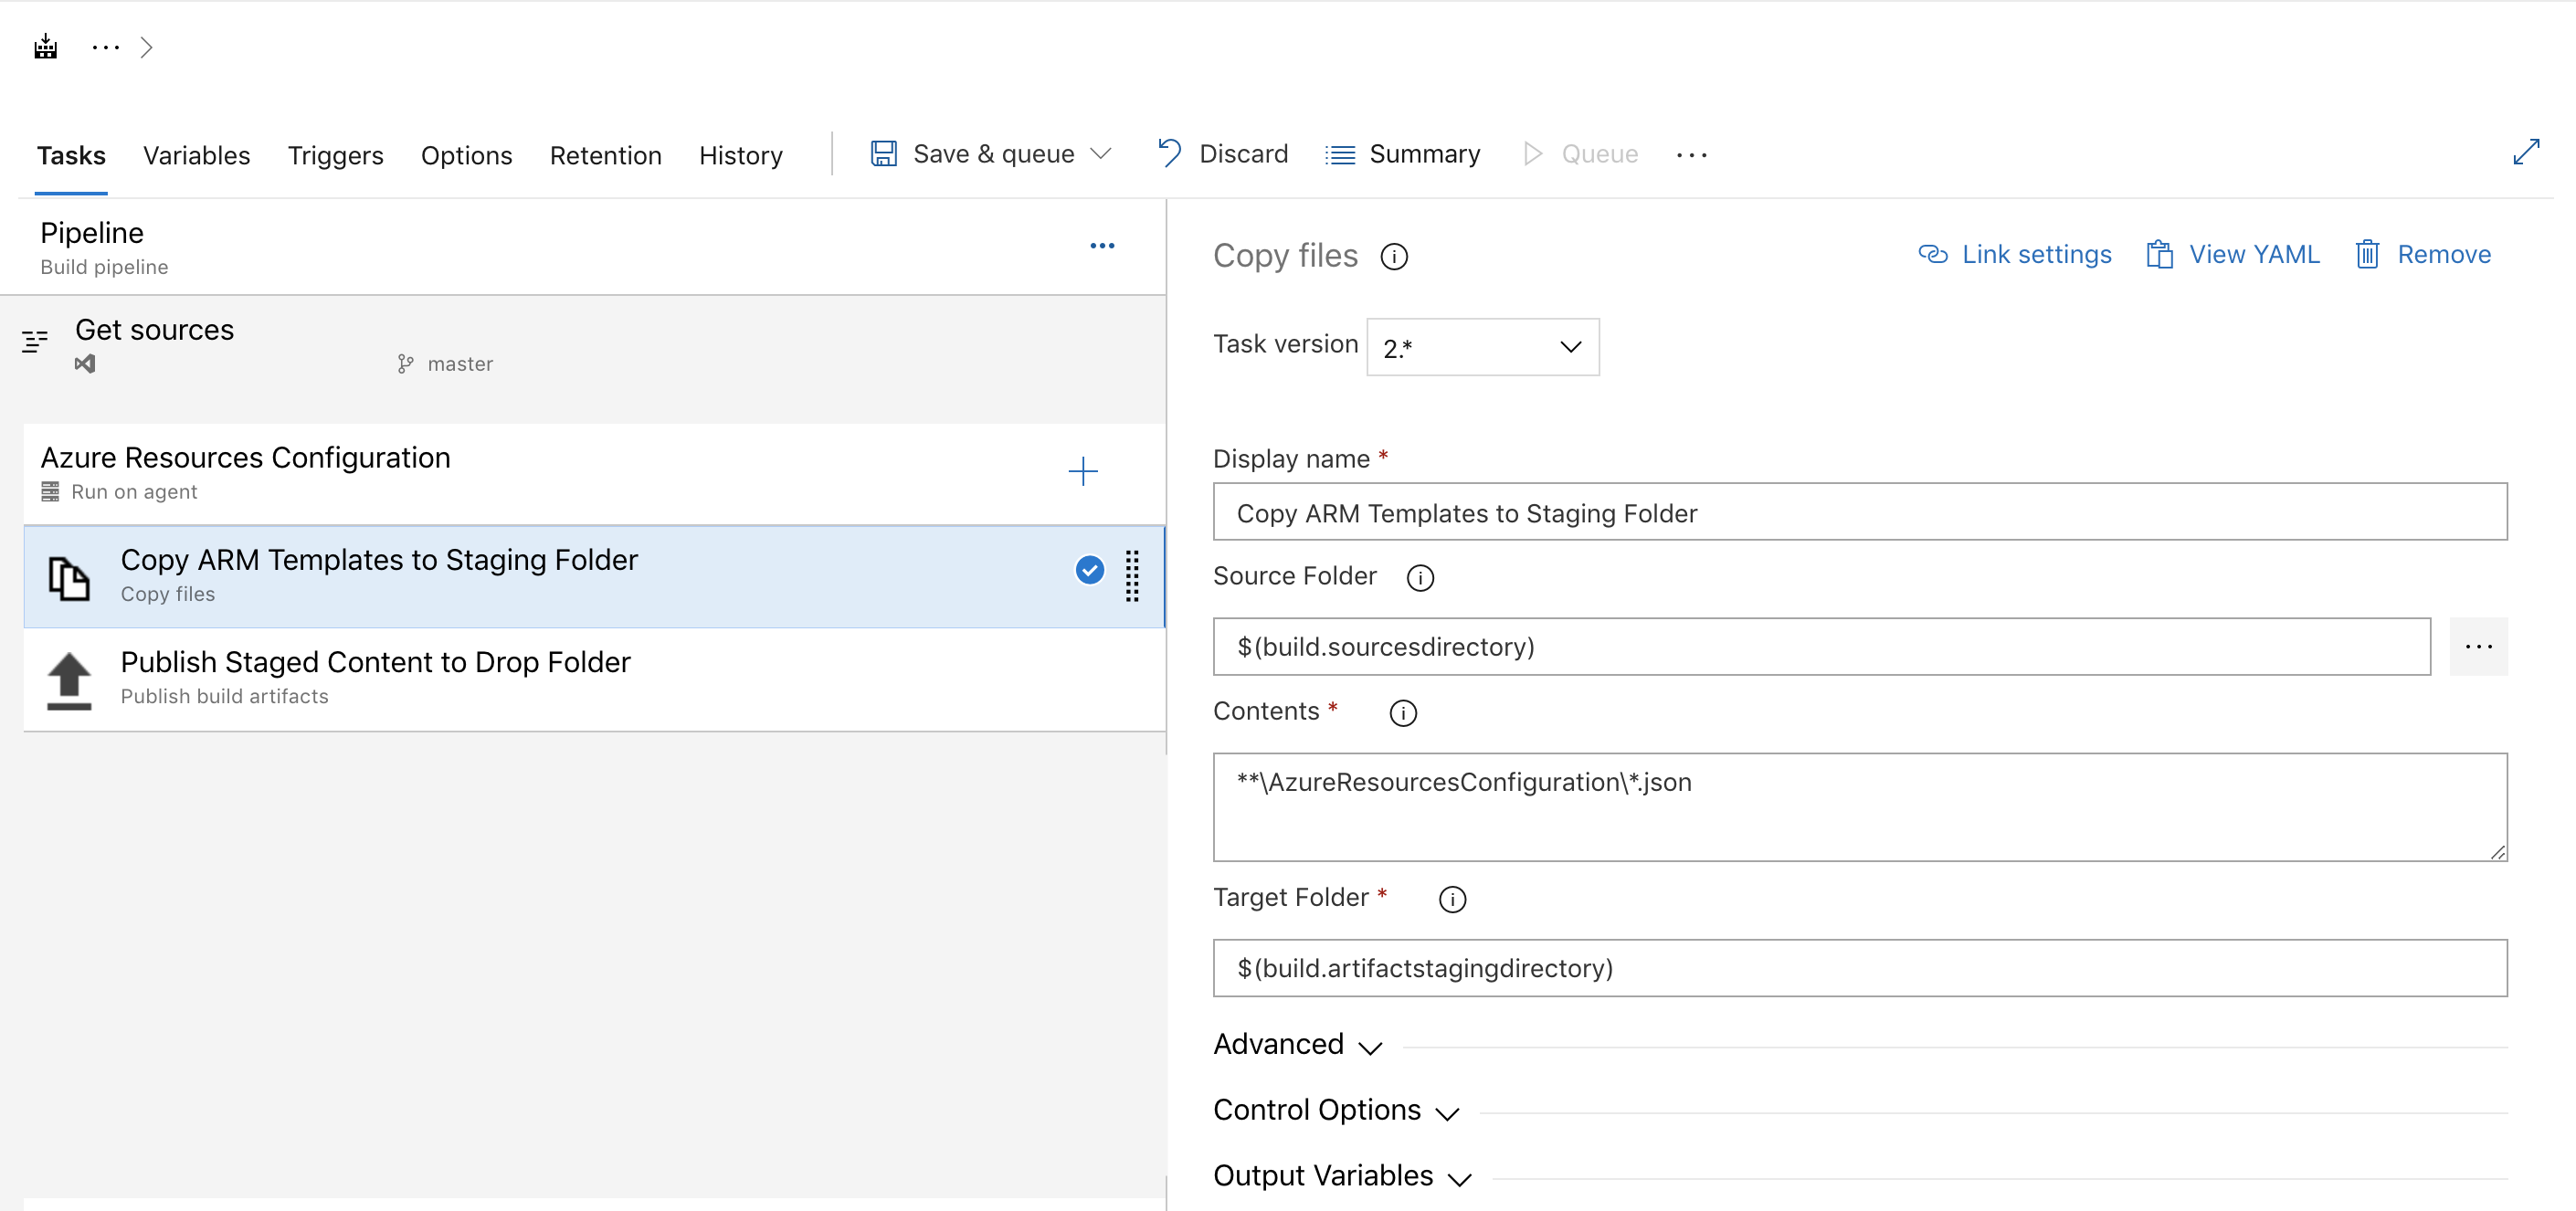
This job will copy our arm template and deploy.parameters to the staging folder and then publish them.
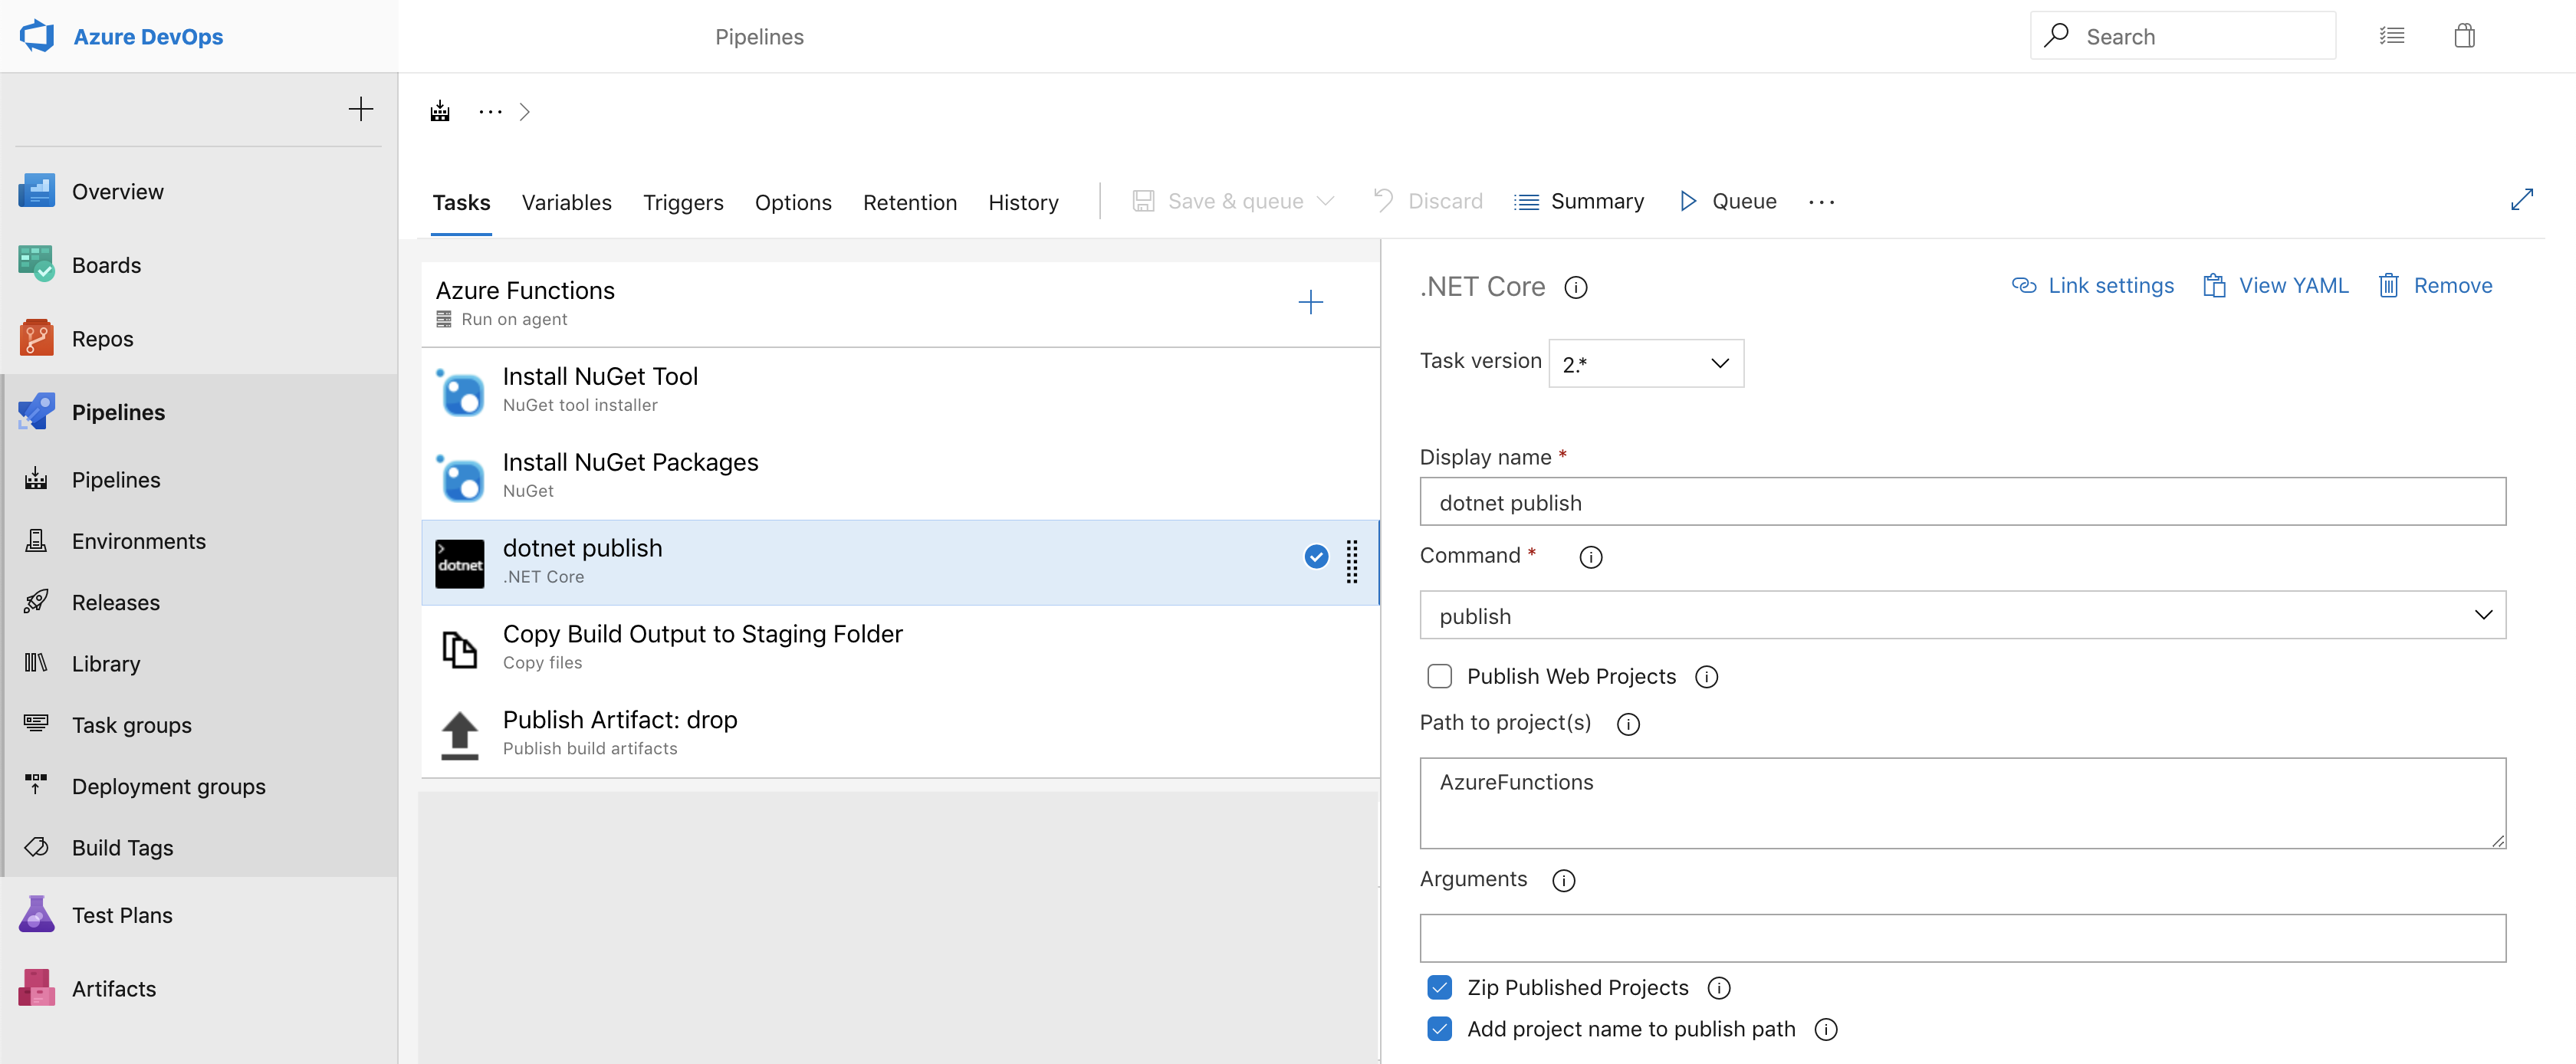
This picture has to do with the actual Azure functions. As you can see the first task in the build will install your NuGet tool and the second one will install any NuGet packages you need. The third command is a dotnet publish which will make sure everything is configured and zipped up ready for copy to the staging folder. The fourth task copies from the build output to staging folder. Lastly, the fifth job will publish the staging folder to the release.
Release Pipeline
The first task to tackle on the release pipeline is confirming that all of our environment variables are set correctly. All of the left hand side variables should match verbatim unless you have differently named variables in your deploy-parameters.json as seen below.
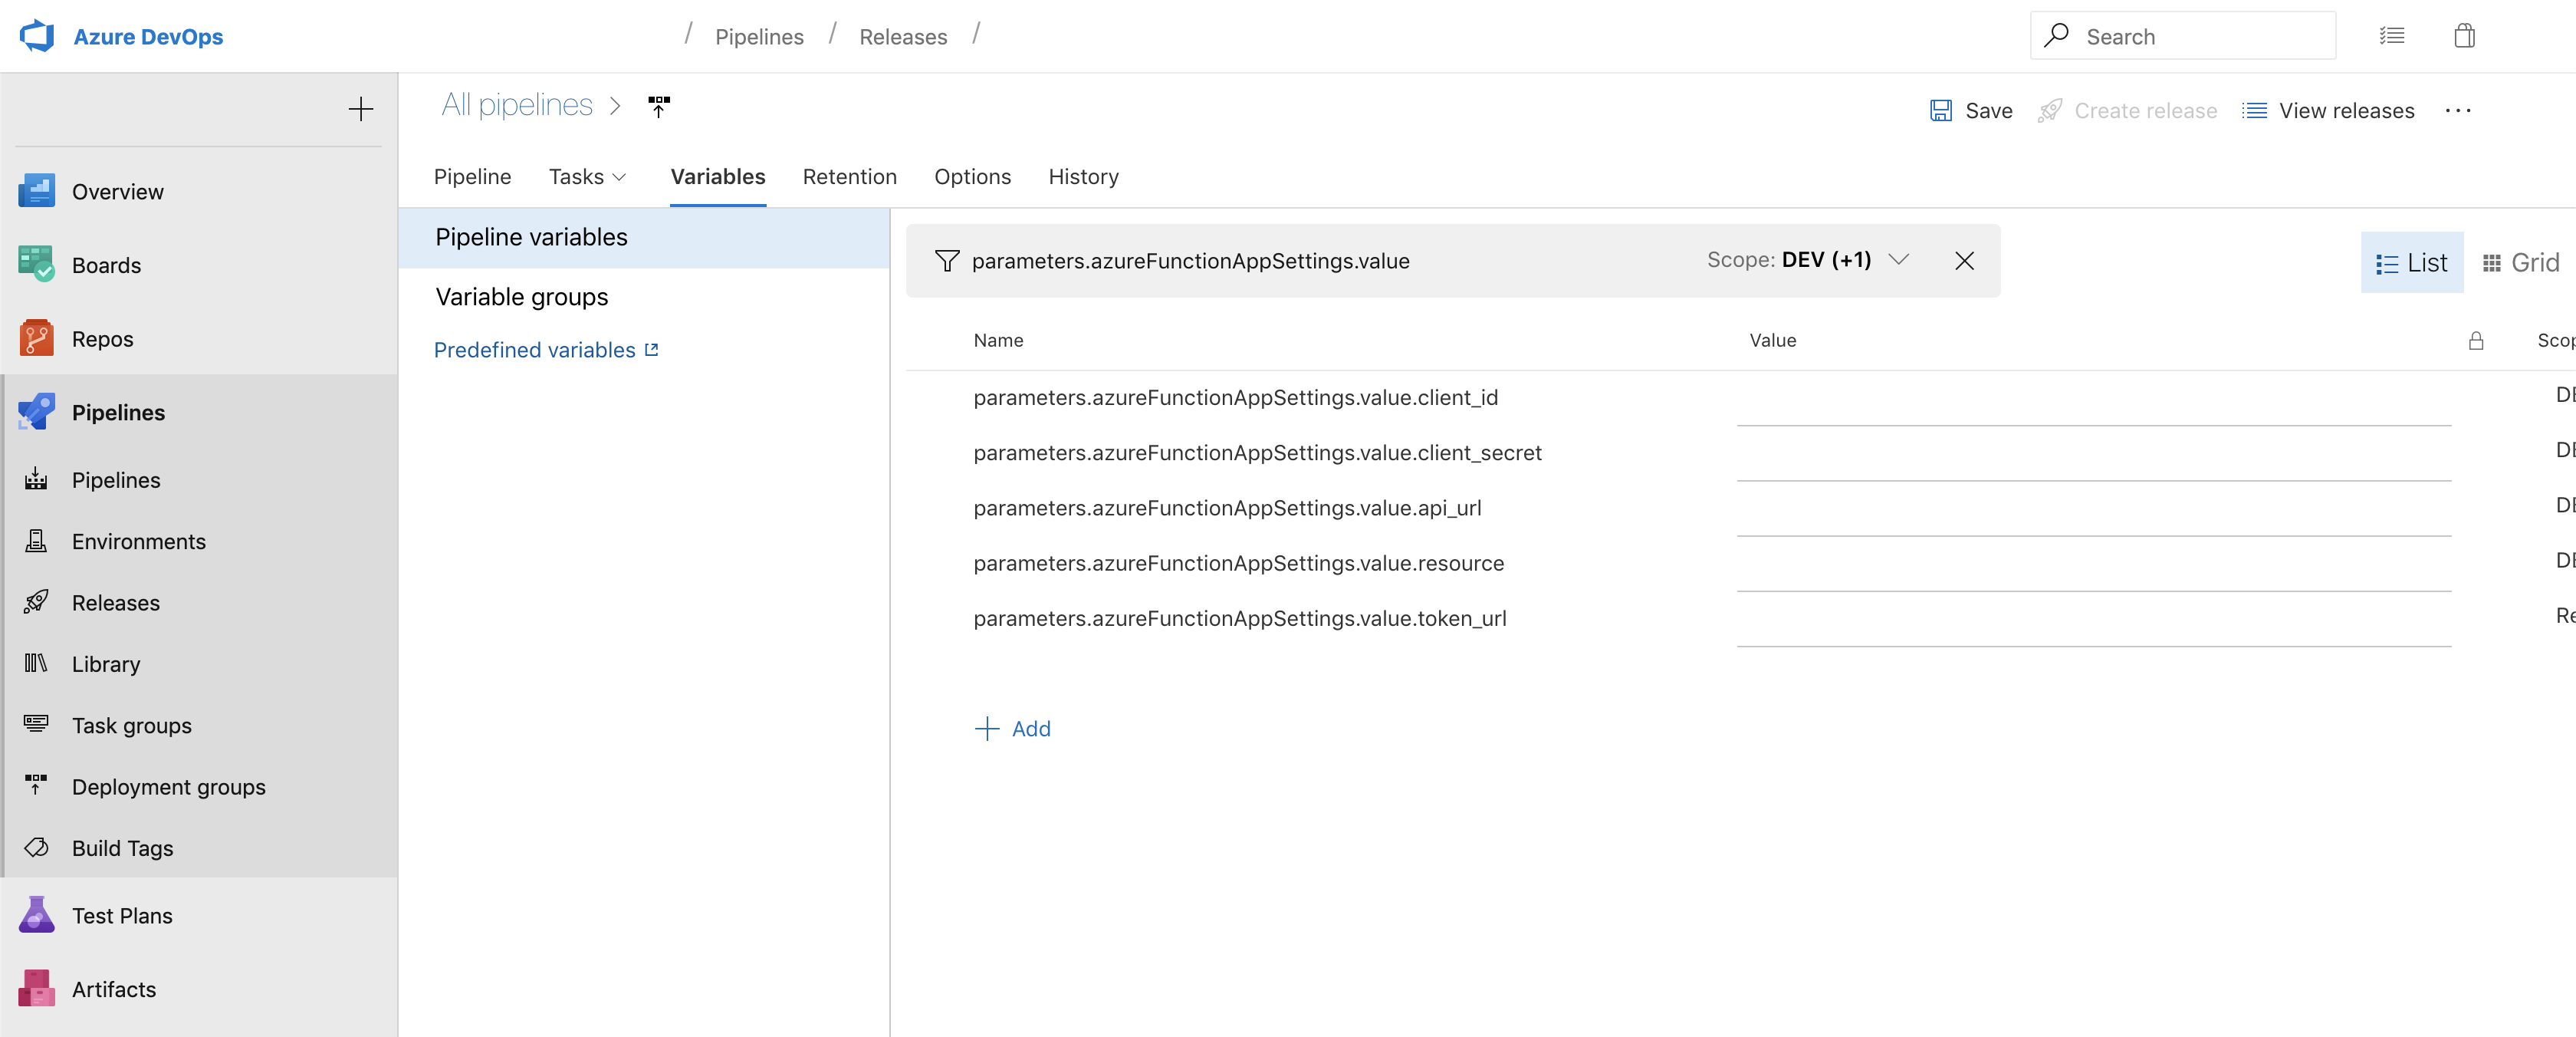
The simplest one to set is the .api_url. That will be the URL endpoint of the API you want to hit as an end goal. Everything else can be found in the Azure Active Directory app registration that you should already have easy auth going through. We will start knocking out the rest of the variables and we will get them from the following pictures.
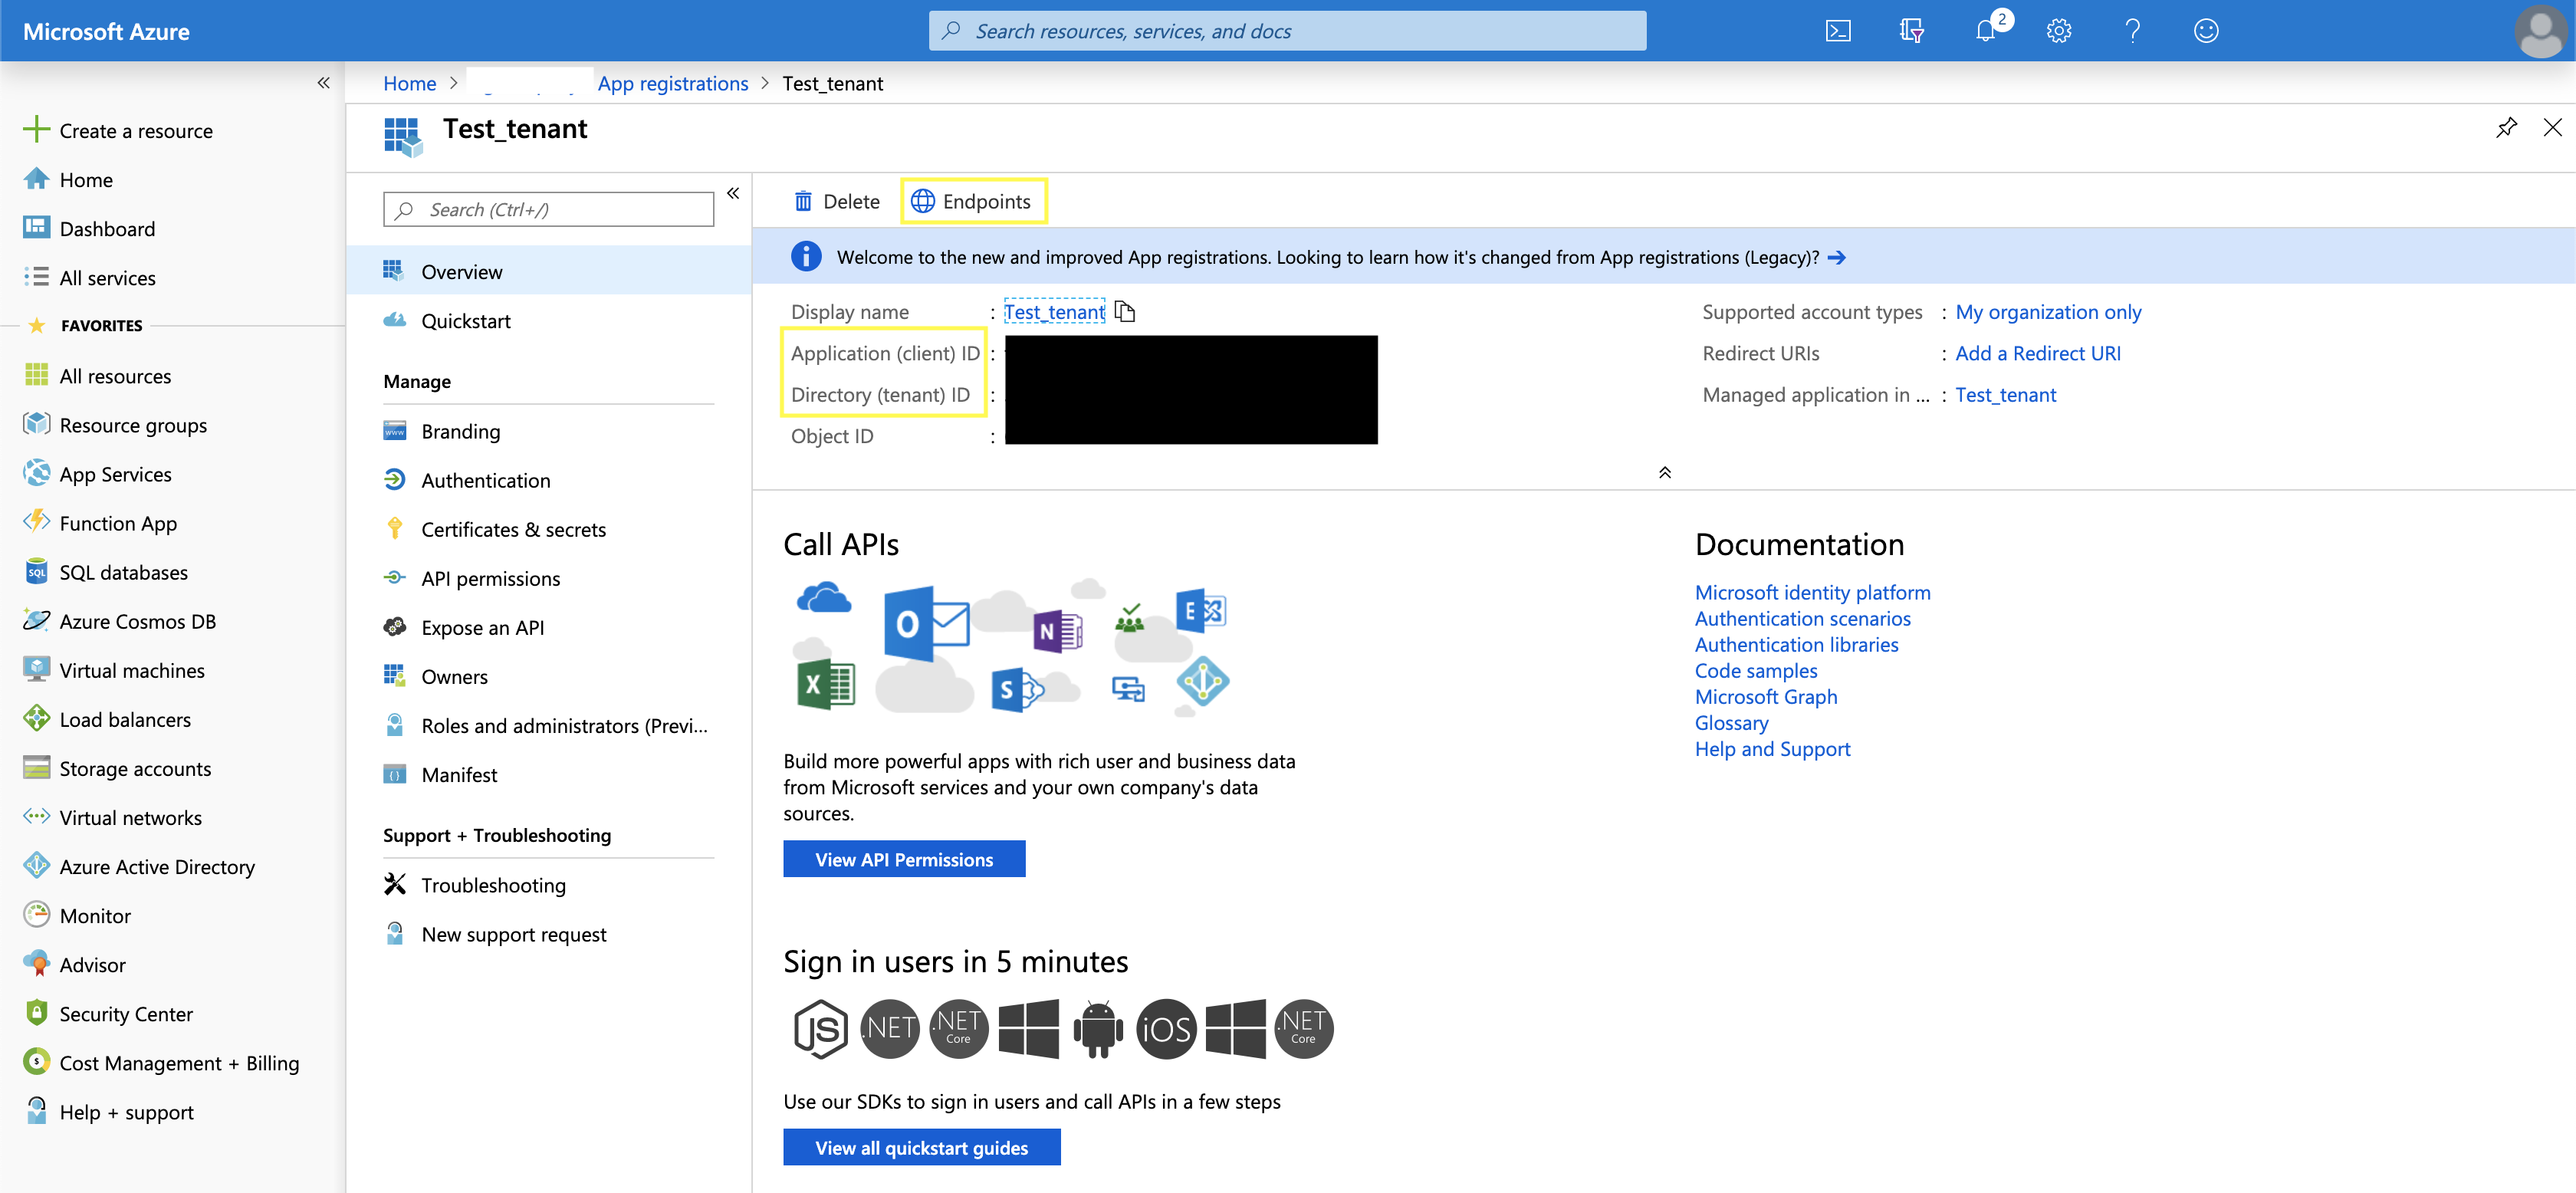
In the picture above you can see a few highlighted areas. The ones important to us will be EndPoints and the (client) ID. The variables .client_id and .resource are both the (client) ID from our app registration that Easy Auth goes through. The token_url is under Endpoints and it is the link listed under OAuth 2.0 token endpoint (v1). In the following picture I will address the final environment variable.
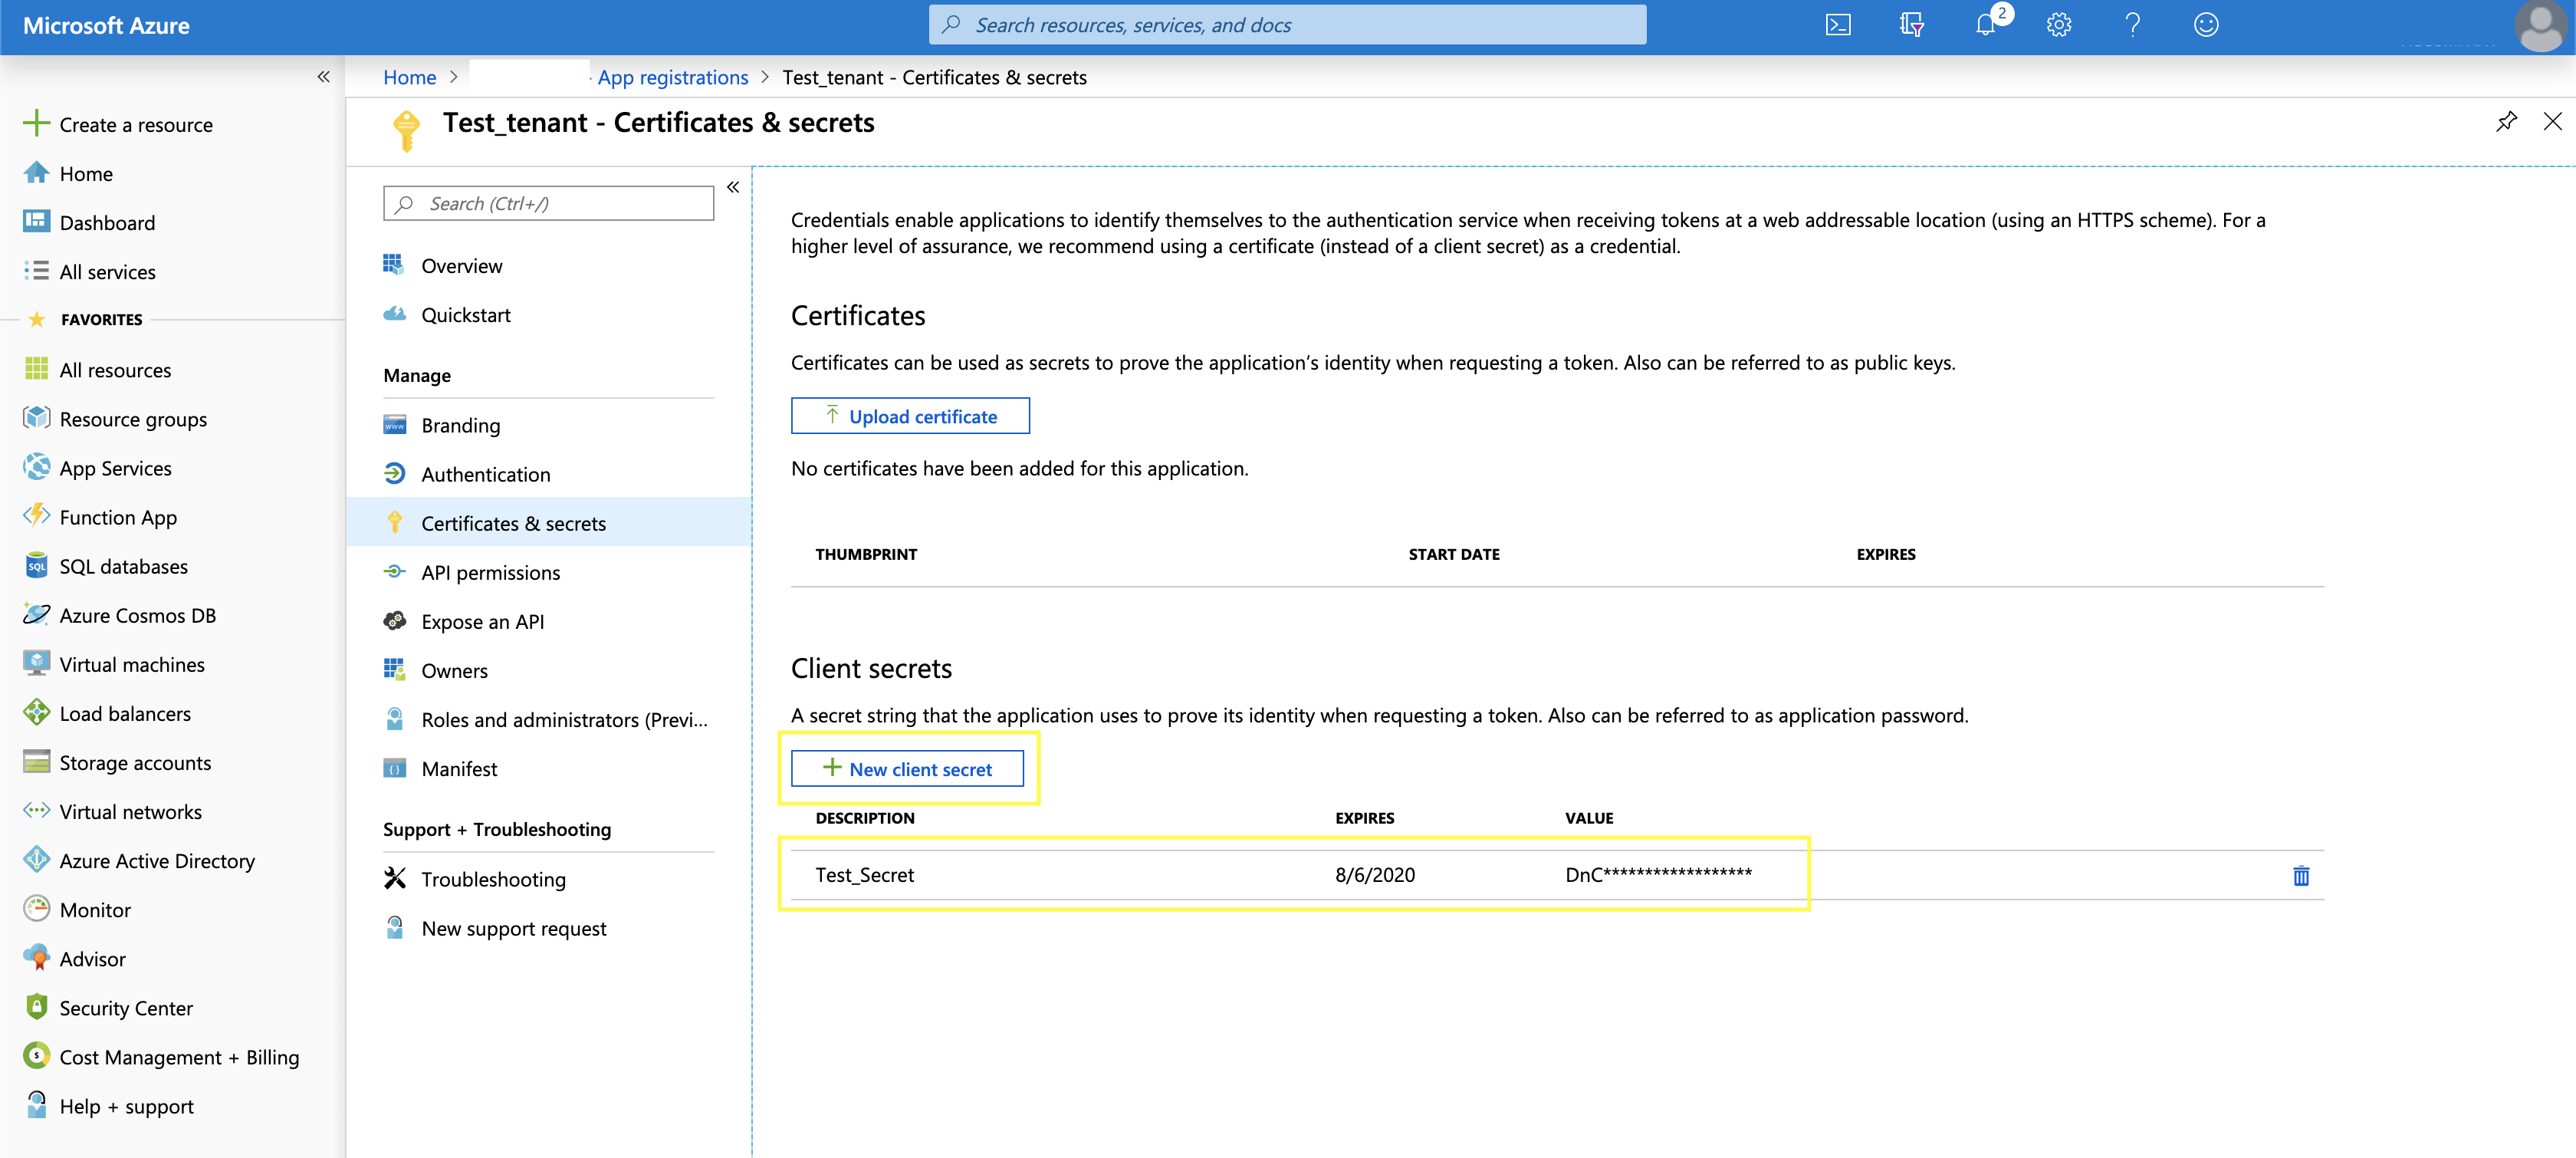
In the final picture we will create a new client secret that will only be visible the first time it is created so make sure you save it somewhere. Once it is created and you navigate away from your app registration and back you will see something similar to Test_Secret. This secret will be in the .client_secret variable. Next is the DevOps release task.
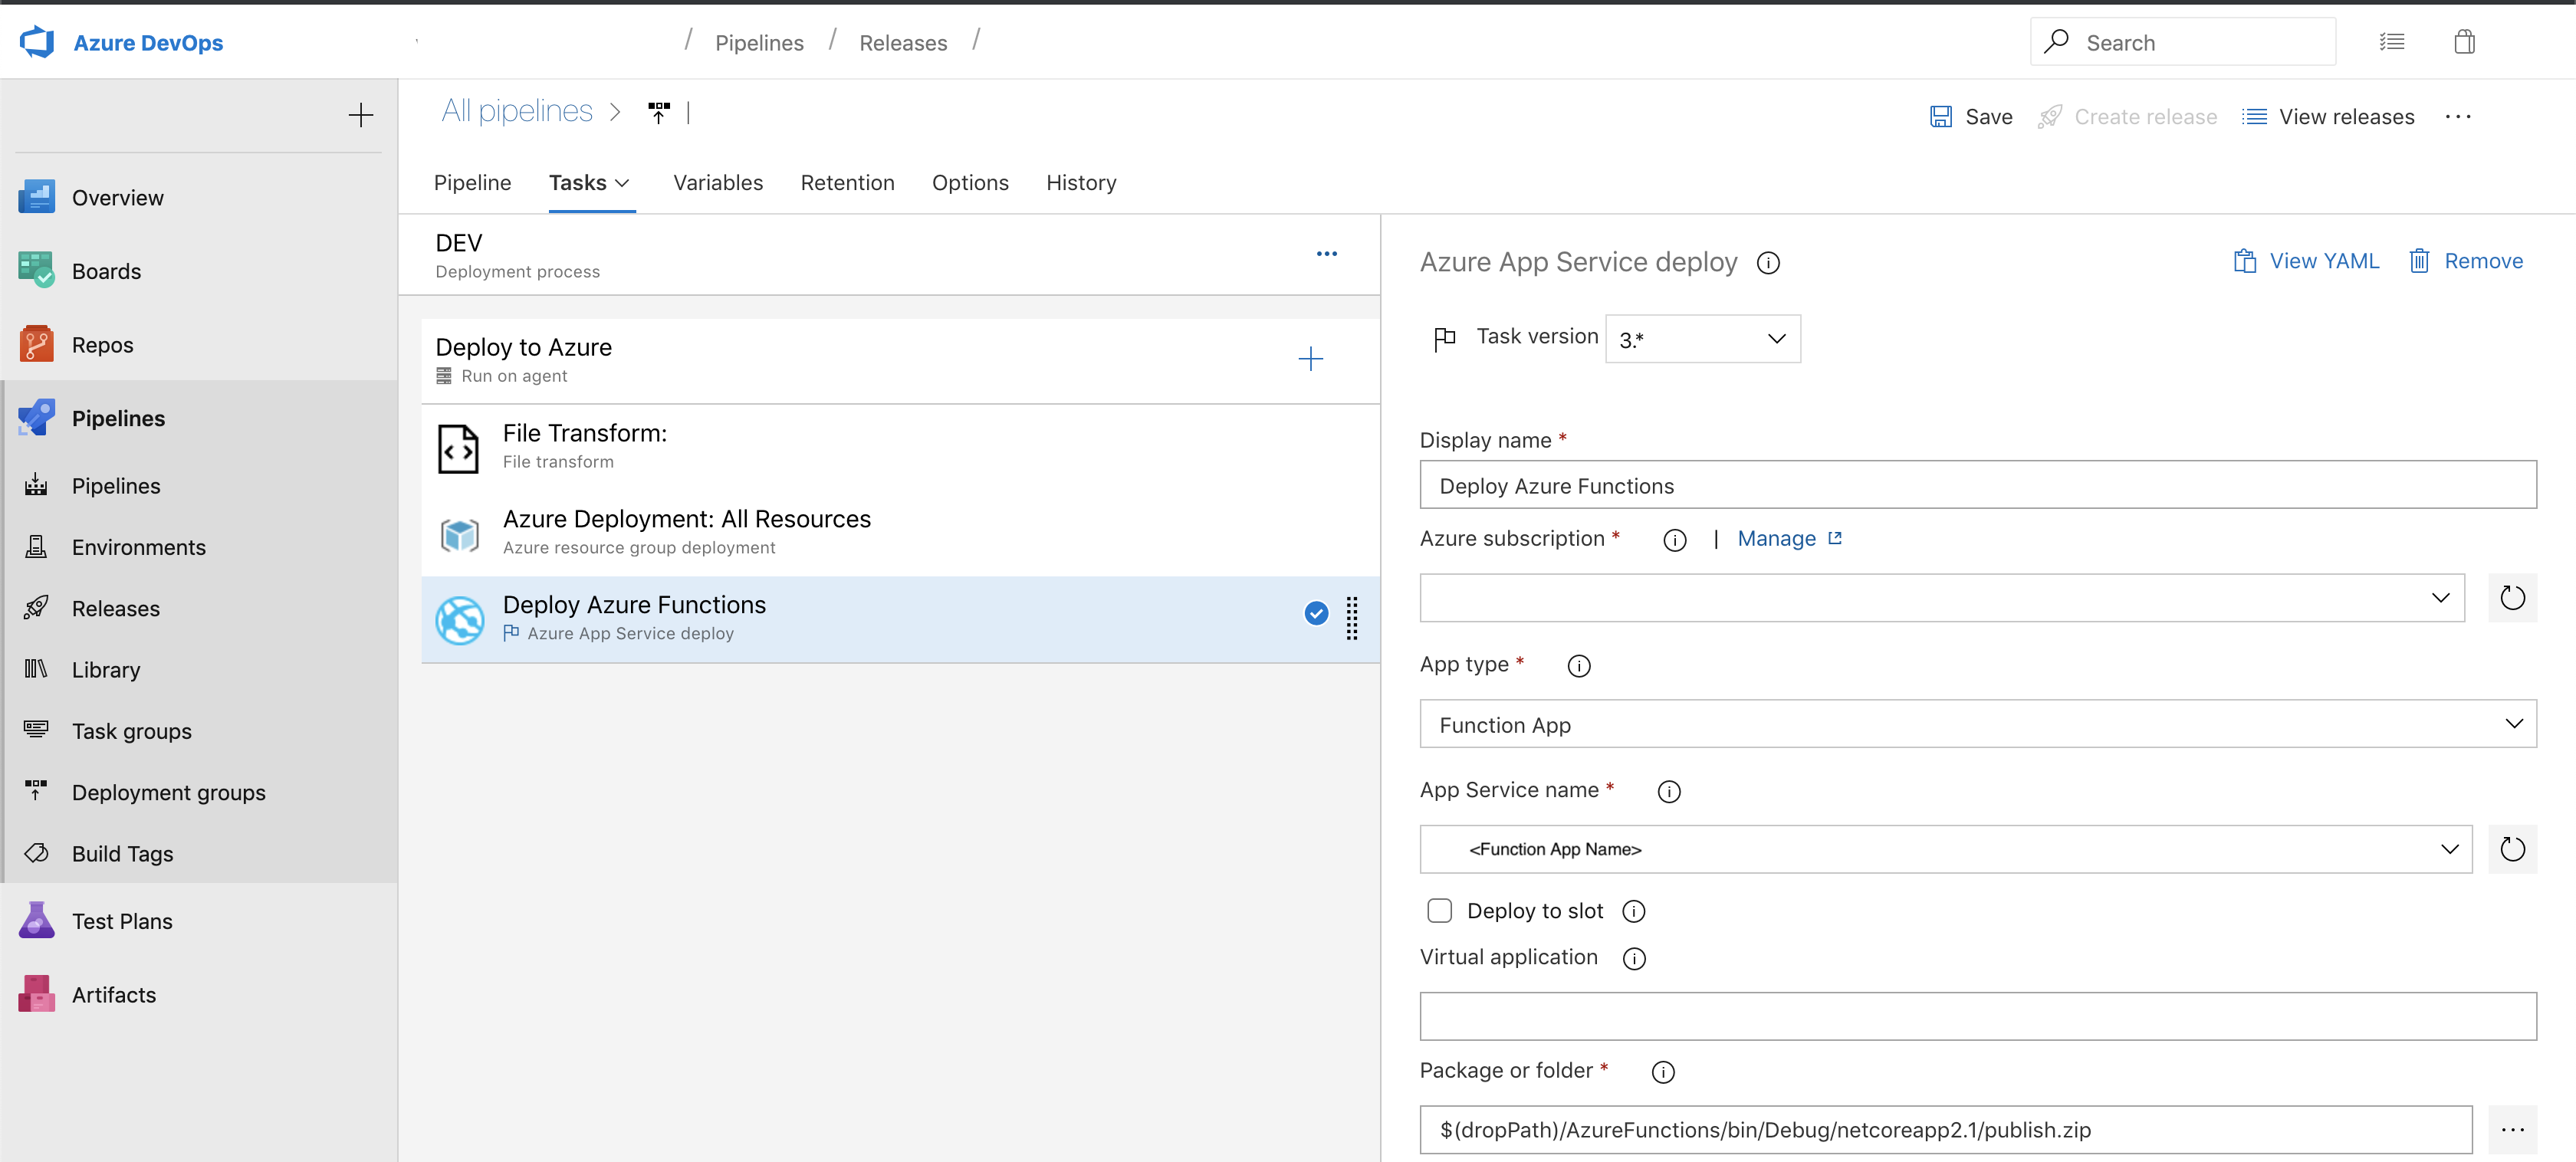
This picture shows 3 tasks. The first task if a file transform that will do a Json substitution. It will sub your env vars into you deploy-parameters.json. It will overwrite the REPLACE_ME with the right values. The second step will deploy our infastructure to Azure. It will provision the Azure Function resource in Azure. The final task will then put our code onto your Azure function. If everything works you should see something like this:

You should be able to click into your function and see your code. I hope this helps you avoid some of the gotchas that caught us up. Be sure to reach out with any questions/comments by contacting me on My Github!